
# Creating an ID mapping workflow (provider services)
<a name="create-IDMW-provider-services-one-acct"></a>

This topic describes the process of creating an ID mapping workflow for one AWS account using a provider service called LiveRamp. LiveRamp translates a set of source RampIDs to another set using either maintained or derived RampIDs.

**To create a provider service-based ID mapping workflow for one AWS account**

1. Sign in to the AWS Management Console and open the AWS Entity Resolution console at [https://console.aws.amazon.com/entityresolution/](https://console.aws.amazon.com/entityresolution/).

1. In the left navigation pane, under **Workflows**, choose **ID mapping**.

1. On the **ID mapping workflows** page, in the upper right corner, choose **Create ID mapping workflow**.

1. For **Step 1: Specify ID mapping workflow details**, do the following.

   1. Enter an **ID mapping workflow name** and an optional **Description**.

      ![The name and description fields on the Specify ID mapping workflow page](https://docs.aws.amazon.com/entityresolution/latest/userguide/images/specify-ID-mapping-details-name.png)

   1. For the **ID mapping method**, choose **Provider services**.

      AWS Entity Resolution currently offers the LiveRamp provider service as an ID mapping method. If you have a subscription to LiveRamp, then the status appears as **Subscribed**. For more information about how to subscribe to LiveRamp, see [Step 1: Subscribe to a provider service on AWS Data Exchange](prepare-third-party-input-data.md#subscribe-provider-service).

      ![The Subscribed status for the LiveRamp ID mapping method on the Specify ID mapping workflow page](https://docs.aws.amazon.com/entityresolution/latest/userguide/images/id-mapping-method.PNG)
**Note**  
Ensure that your data input file format aligns with the provider service's guidelines. For more information about LiveRamp's input file formatting guidelines, see [Perform Translation Through ADX](https://docs.liveramp.com/identity/en/perform-transcoding-through-adx.html) on the LiveRamp documentation website.

   1. For **LiveRamp configuration**, enter the following values that LiveRamp provides:
      + **Client ID manager ARN**
      + **Client secret manager ARN**

      ![The LiveRamp configuration fields on the Specify ID mapping workflow page](https://docs.aws.amazon.com/entityresolution/latest/userguide/images/liveramp-configuration.PNG)

   1. (Optional) To enable **Tags** for the resource, choose **Add new tag**, and then enter the **Key** and **Value** pair.

   1. Choose **Next**.

1. For **Step 2: Specify source and target**, do the following.

   1. For **Source**, choose the scenario that applies to you and then take the recommended action.


<table>
<thead>
  <tr><th>Scenario</th><th>Recommended action</th></tr>
</thead>
<tbody>
  <tr><td>Use your own AWS Glue database, AWS Glue table, and schema mapping in the ID mapping workflow.</td><td><ol><li>  Choose <b>Schema mapping</b>. </li><li> Select an <b>AWS Region</b>, <b>AWS Glue database</b>, the <b>AWS Glue table</b>, and then the corresponding <b>Schema mapping</b>. </li></ol>You can add up to 19 data inputs.</td></tr>
  <tr><td>Use an existing matching workflow that points to the record data you want to use in the ID mapping workflow.</td><td> <ol><li>  Choose <b>Matching workflow</b>. </li><li> Select an existing <b>Matching workflow</b> from the dropdown list. </li></ol> </td></tr>
</tbody>
</table>


   1. For **Target**, take one of the following actions based on your chosen ID mapping method.


<table>
<thead>
  <tr><th>ID mapping method</th><th>Recommended action</th></tr>
</thead>
<tbody>
  <tr><td><b>Rule-based</b> </td><td>Select an existing <b>Matching workflow</b> from the dropdown list.</td></tr>
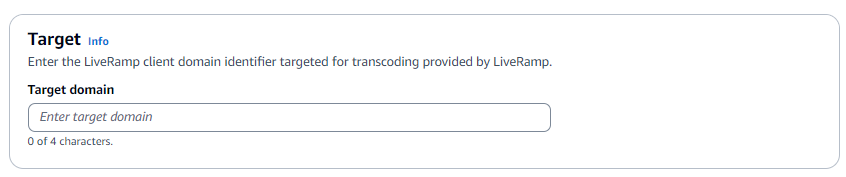
  <tr><td><b>Provider services</b> </td><td>Enter the LiveRamp client domain identifier targeted for transcoding that LiveRamp provides in the <b>Target domain</b>.<br /><img src="https://docs.aws.amazon.com/entityresolution/latest/userguide/images/specify-data-input-target.PNG" alt="The Target field on the Specify source and target page" /></td></tr>
</tbody>
</table>


   1. For **Data staging**, choose the **Amazon S3 location** where you want to temporarily write the ID mapping workflow output.

      ![The Data staging field on the Specify source and target page](https://docs.aws.amazon.com/entityresolution/latest/userguide/images/data-staging.PNG)

   1. To specify the **Service access** permissions, choose an option and take the recommended action.

      ![The Service access options on the Specify source and target page](https://docs.aws.amazon.com/entityresolution/latest/userguide/images/specify-source-target-service-access.PNG)


<table>
<thead>
  <tr><th>Option</th><th>Recommended action</th></tr>
</thead>
<tbody>
  <tr><td><b>Create and use a new service role</b></td><td> <ul><li> AWS Entity Resolution creates a service role with the required policy for this table. </li><li> The default <b>Service role name</b> is <code>entityresolution-id-mapping-workflow-&lt;timestamp&gt;</code>. </li><li> You must have permissions to create roles and attach policies. </li><li> If your input data is encrypted, choose the <b>This data is encrypted by a KMS key</b> option. Then, enter an <b>AWS KMS key</b> that is used to decrypt your data input. </li></ul> </td></tr>
  <tr><td><b>Use an existing service role</b></td><td> <ol><li> Choose an <b>Existing service role name</b> from the dropdown list. <br />The list of roles are displayed if you have permissions to list roles. <br />If you don't have permissions to list roles, you can enter the Amazon Resource Name (ARN) of the role that you want to use. <br />If there are no existing service roles, the option to <b>Use an existing service role</b> is unavailable. </li><li> View the service role by choosing the <b>View in IAM</b> external link. <br />By default, AWS Entity Resolution doesn't attempt to update the existing role policy to add necessary permissions. </li></ol> </td></tr>
</tbody>
</table>


1. Choose **Next**.

1. For **Step 3: Specify data output location – *optional***, do the following.

   1. For **Data output destination**, do the following:

      1. Choose the **Amazon S3 location** for the data output.

      1. For **Encryption**, if you choose to **Customize encryption settings**, then enter the **AWS KMS key** ARN or choose **Create an AWS KMS key**.

   1. View the **LiveRamp generated output**.

   1. Choose **Next**.

      ![The Data output destination fields on the Specify data output location page](https://docs.aws.amazon.com/entityresolution/latest/userguide/images/specify-data-ouput-IDM.PNG)

1. For **Step 4: Review and create**, do the following.

   1. Review the selections that you made for the previous steps and edit them if necessary.

   1. Choose **Create**.

      A message appears, indicating that the ID mapping workflow has been created.

1. After you create the ID mapping workflow, you're ready to [run an ID mapping workflow](run-id-mapping-workflow.md).